Elasticsearch 集群环境搭建
前期准备
- 本次打算使用虚拟机来搭建 Elasticsearch 集群,所以需要准备一台刚安装完成的虚拟机
- 如果虚拟机不会安装的小伙伴可以参考 2021韩顺平 一周学会Linux 的前10节
- 下载软件可能需要科学上网,如有需要请参考 github-科学上网
- 网络拓扑图、配置文件,来自于Elastic认证特训班-吴磊老师
安装 Elasticsearch
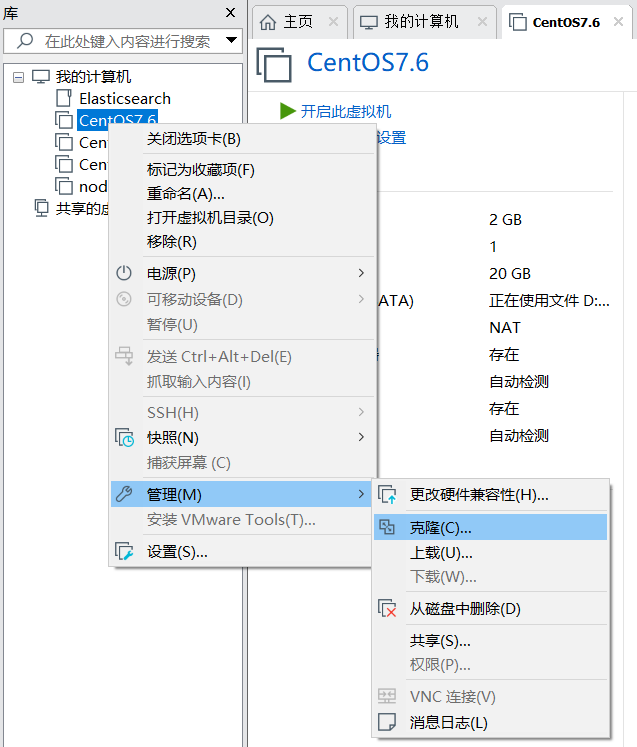
克隆虚拟机
- 从刚安装完成的虚拟机中克隆一份

- 选择克隆类型为创建完整克隆

安装 ifconfig 和 wget 命令
1 | yum install net-tools.x86_64 |
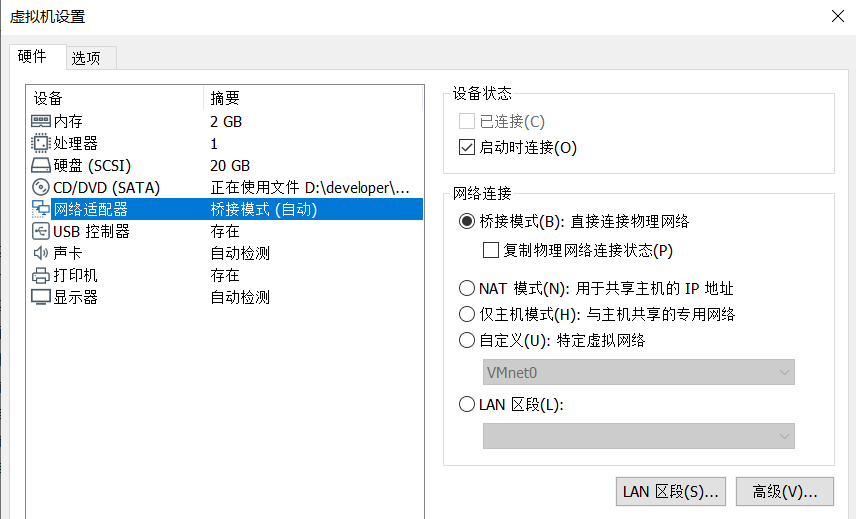
设置桥接模式并设置静态 IP Address
设置桥接模式

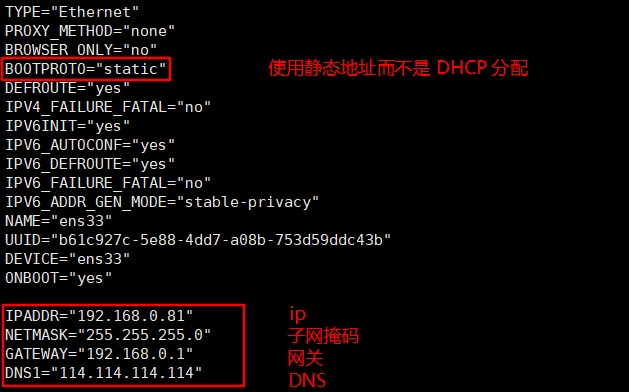
设置静态 IP Address,
- 虚拟机的 子网掩码、网关、DNS 必须与主机相同
- 修改虚拟机 IP Address
1
vi /etc/sysconfig/network-scripts/ifcfg-ens33

安装 java 运行环境
- 通过 官网 可以查询不同版本的 ES 所捆绑的 JDK 版本,7.13 和 7.15 版本都支持 OpenJDK 1.8 和 OpenJDK 11
- 我下载了 11 版本
1 | yum search jdk |
- 注意 java-11-openjdk.x86_64 代表的是 JRE(运行时环境),而 java-11-openjdk-devel.x86_64 代表的是 JDK(开发环境)
- 因为无需调试 java 程序,我只下载了 JRE
- 输入
java -version判断是否安装成功
安装 Elasticsearch
参考官方文档 https://www.elastic.co/guide/en/elasticsearch/reference/7.15/index.html
由于 Elasticsearch 不能用 root 用户启动,因此创建一个用户用于启动程序
1
useradd -m -G wheel eitan #wheel附加组可sudo进行提权 -m同时创建用户家目录
下载压缩包
1
wget https://artifacts.elastic.co/downloads/elasticsearch/elasticsearch-7.15.0-linux-x86_64.tar.gz
如果想下载 7.13 版本直接将命令中的
elasticsearch-7.15.0-linux-x86_64.tar.gz改为elasticsearch-7.13.0-linux-x86_64.tar.gz解压
1
tar -zxvf elasticsearch-7.15.0-linux-x86_64.tar.gz
修改 elasticsearch.yml
使程序通过 Bootstrap Checks
在 /etc/sysctl.conf 文件末尾添加一行 vm.max_map_count=262144
在 /etc/security/limits.conf 文件末尾添加
1
2用户名 hard nofile 65536
用户名 soft nofile 65536
检测是否安装成功
停用防火墙
1
2
3
4# 停用防火墙
systemctl stop firewalld
# 禁止开启自启动
systemctl disable firewalld访问 ip:port,成功启动会出现一下 JSON
1
2
3
4
5
6
7
8
9
10
11
12
13
14
15
16
17{
"name": "node-1",
"cluster_name": "dsl-cluster",
"cluster_uuid": "61AMVhXhQS2FXjr_L0N4oA",
"version": {
"number": "7.13.0",
"build_flavor": "default",
"build_type": "tar",
"build_hash": "5ca8591c6fcdb1260ce95b08a8e023559635c6f3",
"build_date": "2021-05-19T22:22:26.081971330Z",
"build_snapshot": false,
"lucene_version": "8.8.2",
"minimum_wire_compatibility_version": "6.8.0",
"minimum_index_compatibility_version": "6.0.0-beta1"
},
"tagline": "You Know, for Search"
}
常见错误
引导检查报错:文件描述符
1
2
3
4
5
6
7
8
9
10
11
12
13
14
15vim /etc/security/limits.conf
# 添加以下内容
* soft nofile 65536
* hard nofile 65536
* soft nproc 32000
* hard nproc 32000
* hard memlock unlimited
* soft memlock unlimited
vim /etc/systemd/system.conf ,分别修改以下内容。
DefaultLimitNOFILE=65536
DefaultLimitNPROC=32000
DefaultLimitMEMLOCK=infinity
ulimit -n 65535(需使用root账号)引导检查报错:虚拟内存不足
1
2
vi /etc/sysctl.conf
vm.max_map_count=262144
修改配置文件
位置:vi elasticsearch-7.13.0/config/elasticsearch.yml
1 | cluster.name: cfg-cluster01 |